
shower door guide replacement
Shower Door Guide Replacement: A Comprehensive Guide (Updated December 16, 2025)
Navigating shower door guide replacement requires understanding costs, DIY options, and preventative measures; typical installation expenses range from $593 to $898 per door, varying with materials and labor.
Understanding Shower Door Guide Replacement
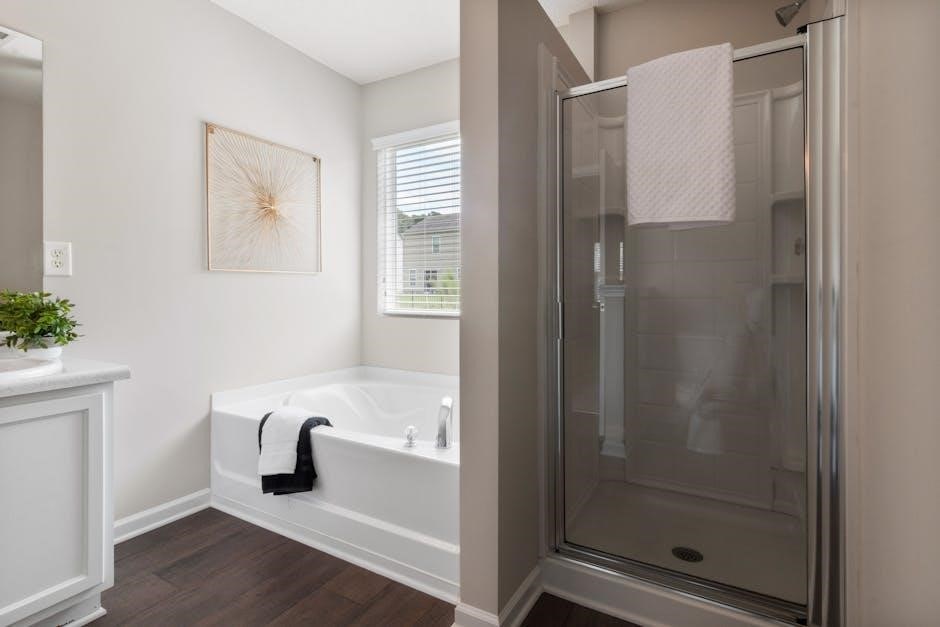
Shower door guide replacement is a crucial aspect of bathroom maintenance, ensuring smooth and secure door operation. These guides, typically found at the bottom of the door, keep the glass panel aligned within the frame, preventing wobbling and potential hazards. Understanding the function of these guides is the first step towards successful repair or replacement.
Over time, these components can wear down due to constant use, exposure to moisture, and the buildup of soap scum and hard water deposits. Recognizing the importance of properly functioning guides is vital for maintaining bathroom safety and preventing costly water damage. A malfunctioning guide can lead to the door slipping off track, potentially causing injury or creating a messy situation. Therefore, addressing guide issues promptly is essential for a functional and safe shower enclosure.
Why Replace Shower Door Guides?
Replacing shower door guides becomes necessary when they exhibit signs of wear, damage, or malfunction. Common reasons include cracking, breaking, or becoming significantly worn down, leading to instability in the shower door’s movement. A slipping or wobbly door is a primary indicator that guide replacement is needed, as this poses a safety risk.
Furthermore, neglecting damaged guides can exacerbate the problem, potentially causing the door to fall off track entirely, resulting in glass breakage and potential injury. Addressing these issues proactively prevents more extensive and expensive repairs down the line. Replacing guides also restores the smooth gliding action of the door, enhancing the overall shower experience and preventing frustrating operational difficulties. Maintaining functional guides ensures a secure and watertight seal, preventing water leakage and associated damage.
Identifying Damaged or Worn Shower Door Guides
Recognizing damaged shower door guides involves a careful visual and functional inspection. Look for visible cracks, chips, or breaks in the plastic or metal components. A common sign is the door’s inability to glide smoothly along the track; instead, it may feel sticky, jumpy, or require excessive force to move.
Pay attention to any noticeable wobbling or instability of the door, indicating the guides are no longer providing adequate support. Examine the guides for signs of wear, such as rounded edges or a flattened profile, which compromise their ability to properly align the door. Also, check for any debris accumulation within the guide channels, as this can impede smooth operation. If you observe any of these indicators, it’s time to consider replacement.
Types of Shower Door Guides
Shower door guides come in several configurations, each serving a specific purpose within the door’s operating system. Bottom guides, often made of plastic, support the door’s weight and ensure smooth sliding along the base. These are frequently the first to show wear and require replacement. Top guides, typically integrated into the header of the shower enclosure, help stabilize the door and maintain alignment.
Side guides, less common in modern designs, provide additional support and prevent the door from swaying. The material composition varies; plastic guides are cost-effective, while metal guides offer increased durability. Selecting the correct type depends on your shower door’s design and the specific issue you’re addressing.
Bottom Guides
Bottom guides are crucial components, directly supporting the shower door’s weight and facilitating its smooth sliding motion; Commonly constructed from durable plastic, they are susceptible to wear and tear from constant use and exposure to water and cleaning agents. A typical bottom guide features a wall height of 9/16 inches and a passage width of 1/2 inch, accommodating glass thicknesses up to 7/16 inch.
Identifying a failing bottom guide involves observing difficulty sliding the door, noticeable gaps, or visible cracks in the plastic. Replacement is relatively straightforward, often involving removing the old guide and snapping in the new one. High-quality replacement parts ensure longevity and maintain the integrity of your shower enclosure.
Top Guides
Top guides work in tandem with bottom guides, providing essential stability and alignment for the shower door. While often less prone to direct impact, they can still wear down over time, leading to misalignment and operational issues. These guides typically feature a channel or groove that the shower door glass slides within, ensuring a secure and smooth movement.
Inspecting top guides involves checking for cracks, looseness, or any signs of deterioration in the material. Replacement may require removing the shower door temporarily to access the guides effectively. Selecting the correct replacement part, compatible with your door’s thickness and frame design, is vital for a successful repair and continued functionality.
Side Guides
Side guides, often found in framed or semi-frameless showers, play a crucial role in maintaining the vertical alignment of the shower door. They work alongside top and bottom guides to prevent the door from swaying or becoming misaligned during operation. These guides are typically constructed from plastic or metal and are affixed to the shower wall or enclosure frame.
Damage to side guides can manifest as cracks, breaks, or loosening from their mounting points. Regular inspection is key to identifying potential issues before they escalate. When replacing side guides, ensuring a precise fit is paramount; incorrect sizing can compromise the door’s stability and sealing capabilities. Consider the material’s durability when selecting a replacement to prolong its lifespan.

Cost Considerations for Shower Door Guide Replacement
Shower door guide replacement costs fluctuate based on materials, labor, and door type, ranging from $530 to $1,390, impacting overall bathroom renovation budgets.
Average Cost of Shower Door Guide Replacement
Determining the average cost for shower door guide replacement involves several variables, but a general range can be established based on current market data. As of December 16, 2025, the basic cost to install a shower door is estimated between $593 and $898 per door. However, this figure is a starting point and doesn’t encompass all potential expenses.
A complete shower glass door installation averages around $959, including both materials and labor. This price can fluctuate significantly, potentially reaching $530 at the lower end or exceeding $1,390 for more complex installations. The total cost is heavily influenced by the chosen shower door type – framed, semi-framed, or frameless – alongside the glass thickness and enclosure size.
Specifically focusing on guide replacement, the cost will be lower than a full door installation, but still requires consideration of material quality (plastic versus metal) and potential labor fees if a professional is hired. Accurate estimation requires a project-specific assessment.

Factors Influencing Replacement Costs
Several key factors directly impact the overall cost of shower door guide replacement. Material costs are paramount; plastic guides are generally more affordable than metal alternatives, influencing the budget significantly. Labor costs also play a crucial role, varying based on location and the complexity of the installation – professional installation adds to the expense.
The door type – framed, semi-frameless, or frameless – is a major determinant. Frameless doors often require more precise and potentially costly guide replacements due to their design. Glass thickness also affects pricing, with thicker glass potentially needing more robust and expensive guides. Furthermore, the size of the shower enclosure influences material quantities and labor time.
Unexpected site conditions or the need for additional repairs can also inflate costs. Obtaining multiple quotes and a detailed breakdown of expenses is highly recommended for accurate budgeting.
Material Costs (Plastic, Metal, etc.)
The selection of material significantly impacts the cost of shower door guide replacement. Plastic guides represent the most economical option, typically ranging from $10 to $30 per guide, offering a balance of affordability and functionality. However, plastic may be less durable long-term.
Metal guides, constructed from aluminum or stainless steel, provide superior strength and longevity, but come at a higher price point – generally between $25 and $60 per guide. Stainless steel offers excellent corrosion resistance, ideal for humid bathroom environments. The specific type of plastic or metal alloy also influences the price.
High-quality replacement parts, like those designed for specific shower door models, may command a premium. Considering the long-term durability and aesthetic preferences is crucial when selecting the appropriate material for your replacement.
Labor Costs
Professional labor costs for shower door guide replacement typically range from $75 to $150 per hour, varying based on geographic location, plumber or handyman experience, and the complexity of the job. A straightforward guide replacement might take between 30 minutes to an hour, resulting in labor costs of $225 to $300.
Factors increasing labor costs include difficult access to the guides, the need to disassemble parts of the shower door, or encountering unforeseen issues like damaged tiles or corroded screws. Some professionals may charge a minimum service fee, even for quick repairs.
Obtaining multiple quotes from qualified professionals is recommended to compare pricing and ensure a fair estimate. Remember to inquire about potential additional charges for travel or disposal of old parts.
Door Type (Framed, Semi-Frameless, Frameless)
Shower door type significantly impacts replacement costs; framed doors, generally the most affordable, typically range from $530 to $800 for full replacement, with guide replacements being less expensive. Semi-frameless doors, offering a balance of style and cost, fall between $800 and $1,200 for complete replacements.
Frameless doors, known for their sleek aesthetic, are the most expensive, ranging from $1,000 to $1,390 or more. Guide replacement on frameless doors can be more complex, potentially increasing labor costs due to the precision required.
The guide’s complexity also varies; framed doors have simpler guides, while frameless doors often utilize more specialized and costly components. Consider the door type when budgeting for guide replacement, factoring in both material and labor expenses.
DIY vs. Professional Replacement
Choosing between DIY and professional shower door guide replacement depends on skill level, tool availability, and complexity; professional installation ensures accuracy and avoids potential damage.
Tools Required for DIY Replacement
Embarking on a DIY shower door guide replacement necessitates gathering specific tools for a smooth and efficient process. A screwdriver set (Phillips and flathead) is crucial for removing and installing screws securing the old and new guides. A utility knife proves invaluable for carefully cutting away old caulk or sealant that may be adhering the guide to the shower enclosure.
Pliers, particularly needle-nose pliers, assist in gripping and maneuvering small parts. A measuring tape is essential for accurate measurements of the existing guide and ensuring the replacement fits perfectly. Safety glasses are paramount to protect your eyes from debris during removal and installation. A caulk gun will be needed for applying new sealant after the guide is installed, creating a watertight barrier.
Consider having a level on hand to ensure the new guide is installed straight, preventing future issues with door operation. Finally, a rubber mallet can gently tap the new guide into place if needed, avoiding forceful impacts that could cause damage.
Step-by-Step Guide to Replacing a Shower Door Guide (DIY)
Begin by removing the old guide; carefully unscrew it using the appropriate screwdriver, noting the screw locations. Gently pry away any remaining caulk with a utility knife, being cautious not to scratch the shower enclosure. Next, prepare the surface by thoroughly cleaning the area where the new guide will be installed, removing any old adhesive residue. Ensure the surface is dry before proceeding.

Now, install the new guide, aligning it precisely with the original position. Secure it with screws, tightening them firmly but avoiding over-tightening. Apply a bead of caulk around the guide’s perimeter using a caulk gun, creating a watertight seal. Smooth the caulk with your finger or a caulk smoothing tool.
Finally, test the shower door’s operation, ensuring it slides smoothly along the new guide. If any adjustments are needed, loosen the screws slightly and reposition the guide before re-tightening.
Removing the Old Guide
Initiate the removal process by carefully inspecting the old shower door guide for visible screws or fasteners. Utilize a screwdriver that precisely matches the screw heads to prevent stripping. Gently unscrew each fastener, storing them in a safe place for potential reuse or as a reference for new hardware.
Once the screws are removed, attempt to gently pry the old guide away from the shower enclosure. A utility knife can be helpful for carefully slicing through any existing caulk or adhesive that’s securing the guide. Exercise caution to avoid damaging the surrounding shower surfaces during this step.
If the guide is particularly stubborn, a small amount of penetrating oil may help loosen its grip. Once free, thoroughly clean the area where the old guide was located, removing any remaining debris or adhesive residue.

Preparing the Surface
Thorough surface preparation is crucial for a secure and lasting installation of the new shower door guide. Begin by meticulously cleaning the area where the old guide was removed, ensuring it’s free from all traces of caulk, adhesive residue, soap scum, and mildew. A scraper, combined with a cleaning solution, works effectively for this purpose.
Inspect the surface for any damage, such as cracks or unevenness. Minor imperfections can be addressed with a patching compound, allowing it to dry completely before proceeding. Ensure the surface is perfectly smooth to guarantee a flush fit for the new guide.
Finally, wipe down the area with a clean, dry cloth and consider applying a small amount of rubbing alcohol to remove any lingering grease or contaminants. This ensures optimal adhesion for the new guide and any associated sealant.
Installing the New Guide
Carefully position the new shower door guide onto the prepared surface, aligning it precisely with the existing mounting points or markings. Apply a bead of silicone caulk along the guide’s edges where it will contact the shower enclosure to create a watertight seal.
Secure the guide using the appropriate screws or fasteners, ensuring they are tightened firmly but not over-tightened, which could damage the guide or the surrounding surface. Double-check that the guide is level and properly aligned with the shower door.
Allow the caulk to cure completely according to the manufacturer’s instructions – typically 24-48 hours – before operating the shower door. This ensures a strong, waterproof bond and prevents leaks. Finally, test the door’s movement to confirm smooth gliding action.
Choosing the Right Replacement Guide
Selecting the ideal guide involves precise measurements, compatibility checks with your door, and considering material durability alongside aesthetic preferences for lasting performance.
Measuring for the Correct Guide Size
Accurate measurements are paramount when selecting replacement shower door guides, ensuring a proper fit and smooth operation. Begin by carefully measuring the height of the existing guide, noting any specific dimensions like the 9/16-inch wall height mentioned for certain plastic guides.
Crucially, determine the width of the guide passage – typically around 1/2 inch – to accommodate the glass thickness. Confirm the glass thickness itself, as guides are designed to fit specific ranges, up to 7/16 inches in some cases.
Don’t simply estimate; use a precise measuring tool. Incorrect sizing can lead to installation difficulties, compromised functionality, and potentially necessitate further replacements. Consider the overall shower enclosure dimensions to guarantee compatibility and avoid future issues. A properly sized guide minimizes wasted space and maximizes efficiency.
Compatibility with Your Shower Door
Ensuring compatibility between the replacement guide and your existing shower door is critical for a successful installation. Shower doors come in various types – framed, semi-frameless, and frameless – each potentially requiring specific guide designs.
Consider the door’s overall construction and how the guide interacts with the glass panel. A guide designed for a framed door won’t necessarily fit a frameless one. Verify the mounting style; some guides clip in, while others require screws.
Check for any manufacturer specifications or model numbers on your current door to aid in finding a compatible replacement. Ignoring compatibility can lead to instability, leaks, or even damage to the glass. Prioritize a guide specifically designed for your shower door type for optimal performance and longevity.
Material Selection: Durability and Aesthetics
Choosing the right material for your replacement shower door guide balances durability and aesthetic preferences. Plastic guides are common, offering affordability and resistance to corrosion, but may be less robust for heavier doors. Metal guides, like aluminum or stainless steel, provide superior strength and longevity, though they can be more expensive.
Consider the bathroom’s overall style. Metal guides often present a sleek, modern look, while plastic can be more discreet. High-quality plastic guides are available, ensuring reasonable durability. Look for guides made from highly durable materials, like those designed for a wall height of 9/16 inches.
Evaluate the potential for wear and tear, and select a material that can withstand daily use and cleaning without degrading quickly.
Preventative Maintenance for Shower Door Guides
Regular cleaning and lubrication are vital for extending guide lifespan, preventing damage, and ensuring smooth operation; consistent care avoids costly replacements and maintains functionality.
Cleaning and Lubrication
Maintaining clean shower door guides is paramount to their longevity and smooth function. Regularly wipe down the guides – both top and bottom – with a mild, non-abrasive cleaner to remove soap scum, hard water deposits, and other debris. Avoid harsh chemicals, as these can degrade the plastic or metal components over time.
Lubrication is equally important. After cleaning, apply a silicone-based lubricant to the guides. This reduces friction, allowing the door to glide effortlessly and preventing premature wear. A dry lubricant spray is ideal, as it won’t attract dust and grime. Avoid oil-based lubricants, which can create a sticky residue.
Frequency depends on usage; however, a monthly cleaning and lubrication routine is generally sufficient. For heavily used showers, consider increasing this to bi-weekly. Consistent preventative maintenance significantly extends the lifespan of your shower door guides, saving you money and hassle in the long run.
Avoiding Common Causes of Guide Damage
Preventing damage to shower door guides begins with understanding common culprits. Forcefully sliding the door, especially when misaligned, is a primary cause of wear and breakage. Always ensure the door is properly aligned before attempting to move it. Avoid hanging towels or other items directly on the guides, as this can create undue stress and potentially dislodge them.
Water accumulation and mineral buildup also contribute to deterioration. Regularly squeegee the shower door and guides after each use to minimize water spots and prevent hard water deposits. Address any leaks promptly, as constant moisture exposure can weaken the guide material.
Be mindful of cleaning tools; abrasive scrub brushes or harsh chemicals can scratch or degrade the guides. Gentle cleaning methods and appropriate lubricants are key to preserving their integrity and extending their functional lifespan, ultimately reducing the need for frequent replacements.

Extending the Lifespan of Your Shower Door Guides
Maximizing the longevity of your shower door guides requires a proactive approach to maintenance. Regular cleaning and lubrication are paramount; use a mild detergent and water to remove soap scum and grime, followed by a silicone-based lubricant to ensure smooth gliding. This prevents friction and reduces wear. Inspect the guides periodically for any signs of cracks, chips, or misalignment, addressing issues promptly before they escalate.
Gentle usage is crucial. Avoid slamming or forcing the shower door, and encourage all household members to do the same. Consider installing a shower door roller adjustment tool to fine-tune alignment and minimize stress on the guides. Choosing high-quality replacement guides made from durable materials, like robust plastics or metals, also contributes to a longer lifespan.
Consistent care will significantly delay the need for replacement, saving you both time and money in the long run.